Repairing Export-It Database
The process that needs to be followed to repair database, or index, corruption is given by the following instructions, but this process must only be performed when no Syscob application window is open for any user! (i.e. when neither Export-It nor Export-It Plus is in use on any computer or by any login). In simple terms, the database cannot be in use by anyone else while it is being repaired.
Process to Prepare for Re-Index
When all the Syscob windows, including SEDI_exp, are closed then follow these instructions as a preliminary process to ensure that there are no RFPs, EDNs, et cetera in the database which have an “empty” Exporter Reference value (which “breaks” an index):
- Start the RFPs shortcut [or the ExportIt shortcut for EDNs or PRAs after step 5].
- Place the cursor in the Exporter Reference field. Hold down the [Ctrl] key and press the [End] key on the keyboard (i.e. press [Ctrl]+[End] keys together) then release both keys. This should show the physically last RFP [or EDN or PRA].
- With the cursor still in the Exporter Reference
field. Hold down the [Ctrl] key and press the
[Home] key on the keyboard (i.e. press
[Ctrl]+[Home] keys
together) then release both keys. This should show the physically first
RFP [or EDN or PRA]:
- If the Exporter Reference field is blank [empty] then go to step 4, or
- If the Exporter Reference field is not empty, i.e. has a valid RFP [or EDN or PRA] reference then go to step 6.
- With the cursor in the blank Exporter Reference field hold down the [Shift] key and press the [F2] key on the keyboard (i.e. press [Shift]+[F2] keys together) then release both keys. You should get a confirmation dialog asking if you wish to delete this RFP [or EDN or PRA]. Answer the dialog to allow the invalid [blank] RFP [or EDN or PRA] to be deleted.
- Go back to step 2 [above] and repeat steps 2, 3 and possibly 4 until all RFPs [or EDNs or PRAs] with blank references have been deleted.
- When there are no, or no more, empty reference records then close the RFPs [or EDNs or PRAs] window. If the RFPs shortcut was just closed then open the ExportIt shortcut and, if EDNs are used, click the big EDNs button and repeat steps 2 through 5 for EDNs. When all blank EDNs have been deleted, or if EDNs are not used, press the big PRAs button and then repeat steps 2 through 5 again for PRAs. When all empty records for RFP, EDN and PRA data have been deleted go to the next “re-index” process.
Do not continue to re-indexing until all EDI documents with an “empty” Exporter Reference value have been deleted! Indexing will not produce valid results when any “empty reference” documents exist.
Process to Re-Index Database
After all “empty reference” documents have been deleted the next process is to re-index the database files so that they can be checked for integrity. This is a process that will vary depending on the type of errors, if any, encountered during the database repair. For a database without integrity issues, but only “broken” index files, these steps show the process (but step 5 may indicate a “cleanup” process is required):
- Open the Maintenance shortcut and select Re-Index ALL Export-It Data Files from the Maintenance menu.
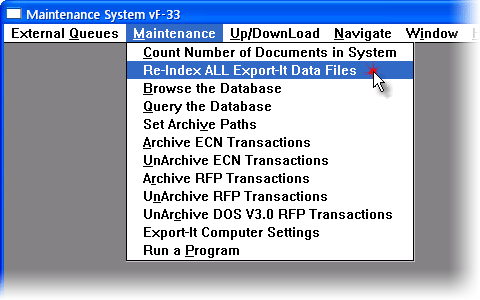
- An Information dialog stating that no other users can be active will appear. When all Syscob windows for all users are closed answer the dialog with the OK button.

- Now a window with two buttons will be visible. Press the Step 1. Re-Index Datafiles button.
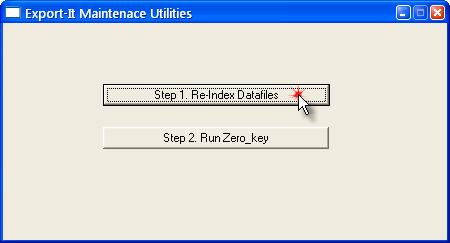
- This will open a Select file(s) to sort window. Press the Select all button in the upper right of this window (ticks will appear on the left) and then press the Sort button at the bottom of the window to sort the database and create a set of index files.
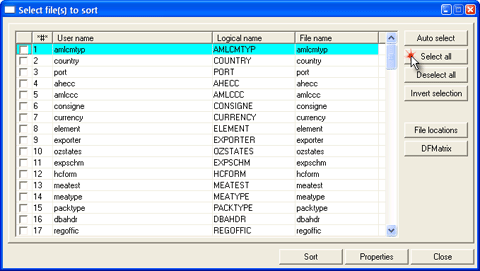
![Sort selected [all] files](img/05_Select_files_480x271.bmp)
- A Reindex, status window will open at the top left with information scrolling in the top pane while sorting. When sorting is complete the lower pane should say “” (see Process to “Cleanup” Duplicates section that follows this one if it shows errors). When the re-index indicates no errors just press the Close button because re-indexing has created preliminary indices.

- When the Reindex, status window closes the panel with the two buttons should be visible again. Press the Step 2. Run Zero_key button to repair any data reference integrity issues.

- In the Zero_key window that opens press the Begin button at the bottom of the window to repair database relationships between tables. Lines will scroll in the log pane while the repairs are underway (note that the progress bar may “backtrack” when a repair is made).

- At the end a line will say “” with a number. If the number of problems fixed is zero [0] then the database repair process is complete, but if any errors were found and fixed then steps 3 through 5 above must be performed again (because “fixing” an error changes the database content so that the preliminary index files that were created are no longer valid). In other words, when errors are corrected you must press the Step 1. Re-Index Datafiles button again, and perform another sort, but there is no need to do the Step 2. Run Zero_key button again in such a case.

- Upon completion of the repair operations close all of the windows, including
the Maintenance window. The database
is now repaired and users may begin using the Syscob applications again.
Process to “Cleanup” Duplicates
When the Reindex, status window (step 5 above) shows completion with errors, as in the next capture, then it will be necessary to perform a “cleanup” process to eliminate duplicate records.

To “cleanup” the database press the Cleanup button and then, when the following process is complete, close the Reindex, status window and do not perform steps 6 through 8 of the repair process steps above! When the Cleanup button has been pressed follow these instructions to “cleanup” the database before continuing:
- In the Select file to cleanup window that appears click on one of the files in the list so that it is highlighted [selected] and then press the Clean up file button to repair that file.

- In the Clean up window you may click on a record in the Select record to keep list to see its data content. To manually choose which to retain press the OK button with a record selected [highlighted] in the Select record to keep list and that record will be kept while the other duplicates are deleted. Or, what is usually the simplest approach, just press the Auto clean set button with no record highlighted in the list (as in the following capture) to let the software decide which record should be retained.

- Regardless of whether manual or automatic cleanup of duplicates is done the following Message dialog should appear to inform that a re-index will be needed. This is just to reinforce the knowledge that “fixing” an error changes the database content so that the preliminary index files that were created are no longer valid. Press the OK button to continue.
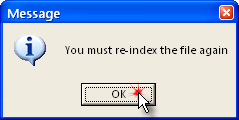
- Should a second Message dialog like the next capture appear then the database problems cannot be repaired in the field! They must be sent to Syscob Support for repair using development tools. Should such be encountered then abandon the repair process and go to the Submit Data topic for instructions on how to send your database files to Syscob. But if no dialog like this one appears then continue with the next step (step 5 below).
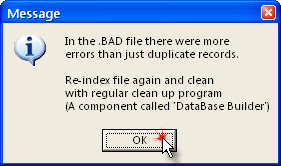
- The Select file to cleanup window should again be visible. If there are any more files in the list then go back to step 1 [above] and repeat the “cleanup” process for the other files until the list is empty as in the next image. When all files have been cleaned up then press the Close button.

- When all duplicates have been cleaned and the cleanup window closed the Reindex, status window will be visible again. It will still show the error that triggered a cleanup, as in the next capture, but just press the Close button on this failed re-index.

- The panel with the two buttons, as below, should now be visible again. Since this re-index failed and required “cleanup” it will be necessary to perform another Process to Re-Index Database from step 3 onward.

Summary and Recommendation
Database repair is a task that should be done at regular intervals, depending on the volume of EDI traffic, as a “preventive maintenance” task. See the sidebar at the right for Syscob recommendations.