Adding or Replacing a Workstation
For a “networked” topology (i.e. a configuration of Export-It with a database shared by multiple users) a new workstation can be added by simply “cloning” an existing workstation in the topology. The security changes introduced by Microsoft with Windows 7 (or Windows Server 2008), or later, also requires special preparation—see the Installing Syscob applications on Windows 7, Server 2008 or later (64-bit or 32-bit) topics for a description of the necessary preparation on such a Windows® environment. However, the eConsent Adjuster tool described in the next section will do this.
The instructions that follow must all be executed under the logon of a user that will run the Syscob application—not the Administrator logon. That user must be a “Member Of” the local Administrators security group so open the User Accounts applet of the Control Panel and ensure that the user account type is an administrator before beginning.
Preparation of the New Computer
If, and only if, the computers has Windows Vista, or later (e.g. Windows 7 or 8.1 or Windows Server 2008 or later) with the oxymoronic concept of “limited addministrators” as the installed version of Windows® then the first step is to prepare the machine by downloading the eConsent Adjuster tool using this eConsent.exe link. Save it where it can be accessed.
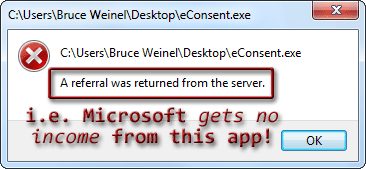
Run the eConsent.exe utility after the download completes. That may result in a dialog like this capture (usually for ActiveDirectory™ network logons):

If such a dialog appears then see the eConsent vs. LSA topic for how to correct it. If such a dialog does not appear, or after correcting the issue and restarting the computer, the main window will open and look like this:

Press the “Adjust…” button at the bottom and a confirmation dialog will appear. Answer “Yes” to allow applying Microsoft KB937624, adjusting security policies and the User Access Control [UAC] level:

After it has done its work the text “Done!” will appear in the bottom pane so press the “Exit” button. Because the policies are only applied when Windows® starts a dialog like the following will appear:

When this dialog is answered the eConsent main window will close, but the system must be restarted for the adjustments to take effect.
Creating an Application Platform Folder
When a database “server” share exists and there is already another platform [computer] which has a working installation of the Export-It application then the “master copy” of the Syscob software in the database “server” share may be used to “clone” onto another computer. However, for a standalone topology (single user on a single PC) the “local” C:\ExportIt\ folder must be copied into a folder on a “server” machine and a share to the folder containing the copied ExportIt\ folder published so that clients may map a drive letter to it (or the “local” drive of the standalone installation may be shared—which Microsoft does not recommend—so that it may be mapped as the “server” share).
The second step of “cloning” onto a computer is to use Windows Explorer to create a new empty \ExportIt\ folder in the root of a “local” disk drive. Then map a drive letter to the database “server” share. Copy all of the files (roughly 100) and only the two [2] subfolders named PROG and VDF7 (and their contents) from the “server” into the newly created “local” \ExportIt\ folder. That creates and populates the new PC with all of the programs, libraries and resources needed to run the Syscob application.
Like installation or update procedures “cloning” must be performed under the logon of the user that will run the Export-It application. That user logon must have these characteristics:
- Privileges of a platform (“local”) administrator.
- “Full” access rights to the Windows® Registry.
- “Full” access rights to a drive letter mapped to the database “server” share which has an ExportIt\ folder in the root directory.
- “Full” access rights to a “local” drive letter which has an ExportIt\ folder in the root directory.
- “Full” access rights to the “windows” folder (but not its subfolders). This may be the actual Windows® directory or, for any version of Windows® prior to Windows 7, a folder specified by a user (not system) environment variable named “” whose value is the path to the user pseudo-windows folder.
The user must have “Full” access permissions to a “windows” folder because that is where an application “INI” file resides. But the user does not need to access any subfolders in this “windows” folder (they do not even need to exist) and for any pre-Win7 system this need not be the actual Windows® directory (it may be anywhere the user “” value specifies). When the conditions above exist then then the next section explains how to register the application on the new computer.
Registering the Application on the Computer
This step requires downloading the “Icon & Rego” wizard from this Export_it_rego_CMR.EXE link. Save it where it can be accessed then follow these instructions:
- Run the “Icon & Rego” program (“”) to create needed Registry and “INI” file settings and create the Desktop and Start button programs menu shortcut icons.
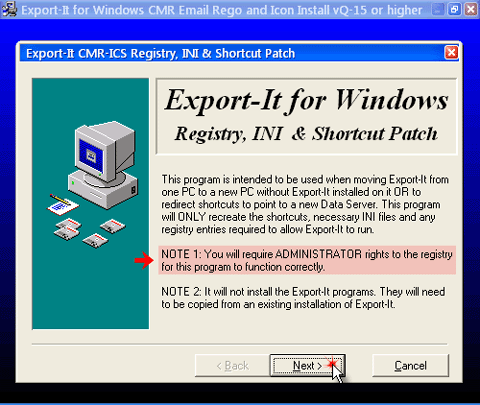
- The “Icon & Rego” wizard will open a full-screen gradient window with a typical installer inner window as seen in the first capture below. On the first page just press the “Next >” button.

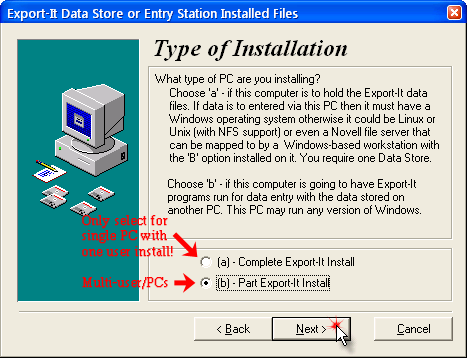
- On the Type of Installation page select type “(b) Part Export-It Install” (unless Syscob software is only installed on one PC for the use of only one user and the database is on that same single PC, which is the only case where a “(a) Complete Export-It Install” is done) then press the “Next >” button.

- On the next page set the Workstation Drive
to the drive letter of the platform “local” drive (where the prior step
copied its contents) and set the Data Server Drive
to the drive letter of the mapped database “server” drive then
press the “Next >” button.
NOTE: For Windows Vista, 7, Server 2008 or later a “mapped” network drive may not be visible unless security tokens are “linked” (see Syscob: Linking Security Tokens topic for details), but eConsent should have done this linking.

- While the wizard is registering the software and creating shortcuts a small progress window, like the next capture, will be visible to show the overall progress of the registration.

- During registration a dialog like the following capture will appear asking whether to search for and remove old shortcut icons. Answer “No” since this is a new installation which would not have any old existing shortcuts:
- After the software has been registered and the user shortcuts created the wizard will automatically go to the last page. On the Registry, INI & Shortcut Install Completed! page press the “Finish” button to complete the Syscob application registration.

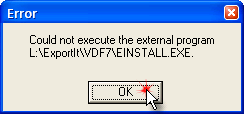
Depending on the version of Export-It that is installed the following two [2] error dialogs may appear at the end (rather than the completed page above). Should the following dialogs appear, starting with failure to find the eInstall executable, be aware that this does not affect application registration! The eInstall program is run after the “Icon & Rego” wizard has finished. So just answer these dialogs with the “OK” button and ignore them.


After the application has been registered it is necessary to register the user logon(s) that will run the Syscob application on this computer so that printers can be assigned and print spooling by the application is possible. The next section explains how that is done.
Registering an Application User on the Computer
In order to use Syscob applications each user that will run them must have a “seat” registered on the computer. Registration of a user requires that the SeatUser Registration tool be downloaded from this SeatUser.exe link. Save it where it can be accessed.
Run the downloaded program under the logon of each user that will employ a Syscob application. When it starts the main window should be overlayed by a dialog like the following capture which states that the Syscob context is usable on the machine:

If the dialog indicates the context is not usable then see how to get assistance at the end of this section, but for a valid installation answer the dialog so that the main window appears and the “Register” button at the bottom can be pressed as in this example:

The main window shows the installation settings for the user and the computer with ticks to indicate which Syscob applications are registered and the installation topology for each application. When the “Register” button is pressed these values will be recorded in the current user Registry and in user and system environment variables. When the registration succeeds a dialog like this capture should appear:

Answering the dialog seen above will, as it says, also close the SeatUser main window. Unless this PC is to perform Secure EDI [SEDI] communications then this completes the “cloning” process and the machine is ready for use of Syscob applications by the registered user(s).
However, if the final dialog indicates failure—or the initial dialog states the context is not usable or if eConsent fails or the “Icon & Rego” installer fails—then Syscob Support can assist in resolving any issues encountered. Simply create an email message “To” support@syscob.com.au and attach both the eConsent.log and SeatUser.log text files to that message. Those files are in the same location as where the downloaded executables were saved and executed. Describe any unusual things that arose during “cloning” in the body of the email then send it. Upon receipt the logs will be analyzed and a response returned to the sender with instructions for how to resolve any problems.
Secure EDI ActiveX Registration
Unless this machine and a user logon is to perform Secure EDI [SEDI] communications for all users and computers then the “cloning” process is complete after the user(s) have been registered. However, if any logon on this PC is to act in the SEDI role then there is one additional process needed to enable SEDI transfers of EDI traffic. If this new machine is not to assume the SEDI role then “cloning” is complete (so ignore the following steps). The new workstation should now be usable under the logon that did the “cloning”. However, to enable SEDI on this PC please perform these staps:
- If this new workstation is to replace the “SEDI machine” then ensure that a “local” folder named “” exists and that a file named “” exists in it (create the folder and/or marker file if necessary).
- On this intended SEDI machine run the “” batch
command from the “”
folder on the “local” drive:
- A Command Prompt window will open and await a keypress. Press any key to start the registrations.
- Answer five [5] Regsvr32 dialogs which report successful registration of an ActiveX server used by SEDI communications with the “OK” button.
- After the fifth dialog the Command Prompt window will close automatically.
- After registration of the ActiveX servers the worksation is capable of performing SEDI communications. However, if communications with the Customs ICS via EDI is required then the requisite Digital Certificates must be installed on the platform. See the SEDI Digital Certificates section in the Export-It Admin Guide for details.
Although the process above may appear to be involved the actual “cloning” of a workstation typically takes about five minutes (including copying of the “local” folder across the network).