Supplying Support Information to Syscob

Unlike the eSupport Diagnostic Wizard, which chooses the diagnostic information to collect based on the context and classes of issues, the eProvide Diagnostic Information tool (icon at right) allows the user to choose the types of information gathered. The submission mechanism used by eProvide is also slightly different. Chosen types of diagnostic files are collected into a “zip” archive which is uploaded via FTP to the Syscob web site and a notification email message is sent to Syscob Support.
The eProvide executable is located on the Export-It “local” [Platform] drive. It may be run by double-click on the \ExportIt\VDF7\eProvide.exe file or by copy-and-paste of “%PlatformEP%VDF7\eProvide.exe” (without quotes) into the Windows® Run… dialog as in this example:
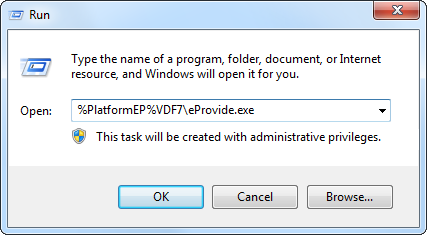
Should eProvide.exe not exist in the \ExportIt\VDF7\ folder of the “local” drive then it can be downloaded from the Collection Tools category of the Syscob Tools repository—or by clicking this this link—and saving it there.
eProvide Main Window
When eProvide starts its main window, captured below, has header and footer panes with the central body split into three [3] panes. User instructions are in the left pane, the middle body pane allows selection of the kinds of diagnostic information to be collected by ticking boxes (with nothing initially chosen) and the left pane has brief descriptions of the types of information that ticking a box will collect and submit:

Should this support tool be executed by an IT support staff member, or via a remote logon, be sure that the normal logon employed by the user to run Syscob applications encountering any issue be used to run this wizard. When that is not the situation then press the Exit button (and confirm quitting) to exit from the program. Switch to the Syscob user logon and then re-run the eProvide Diagnostic Information tool. Only continue as a Syscob user logon.
Step 1: Select Categories to Collect
Diagnostic information choice is organized in a triplet of major categories which each have subordinate categories of detail within that major category. Ticking a box at the major level will both enable its subcategory boxes and, the first time a major type is chosen, may select some or all of the subtypes in that category. For example, ticking the “Secure EDI [SEDI] subsystem” major category will initially tick all of its detail subtypes, but the “Microsoft Windows® software” major category will not tick its subordinate box.
| DIAGNOSTIC CATEGORY | INFORMATION COLLECTED |
| Secure EDI [SEDI] subsystem | Mail and cryptography “.log” files (but not SEDI logs). |
| • EDI Log files | SEDI component “.log” files. |
| • SEDI EDI traffic | EDI Interchange files sent and received. |
| • SPAM email received | Received email that is not from an EDI partner or in an invalid format. |
| Syscob software information | Miscellaneous “.log”, “.txt”, “.prn” and “.ini” files. |
| • Applications registrationss | Syscob Registry “.xml” file. |
| • Applications shortcut links | Syscob links “.xml” file. |
| • Applications folders & files | Syscob drives “.xml” file. |
| • Applications security context | Security context “.xml” file. |
| • Export-It database files | Export-It “.dat” database tables. |
| • Export-It Plus database files | Export-It Plus “.dat” database tables and “.rpt” definitions. |
| Microsoft Windows® software | Security context “.log” files. |
| • Windows® printer devices | Printer “.log” and “.ini” files. |
However, when a major category box does not have a checkmark all of its subordinate boxes will be disabled and the kinds of diagnostic files they represent will not be collected—whether they are ticked or not.
Step 2: Collect Chosen Files into an Archive
When at least one major category of diagnostic information has been ticked the footer Archive… button will become enabled. Pressing it, as in the following example, will start the process of identifying the chosen types of files, generating the “.xml” files (and printer devices information when that is ticked) then constructing a “zip” archive which contains the identified and generated files.
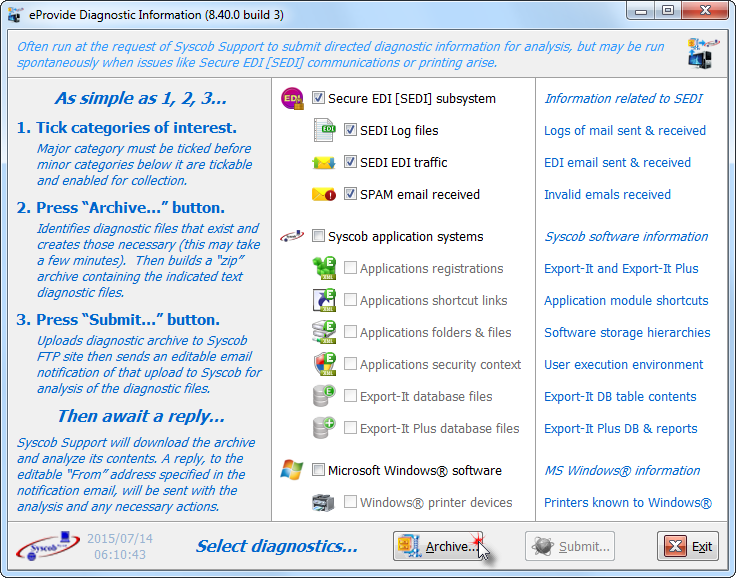
When Archive… is pressed the first phase is to detect, and generate when necessary, selected diagnostic category or categories. During this variable period (usually under a couple of minutes) the elapsed time is shown:
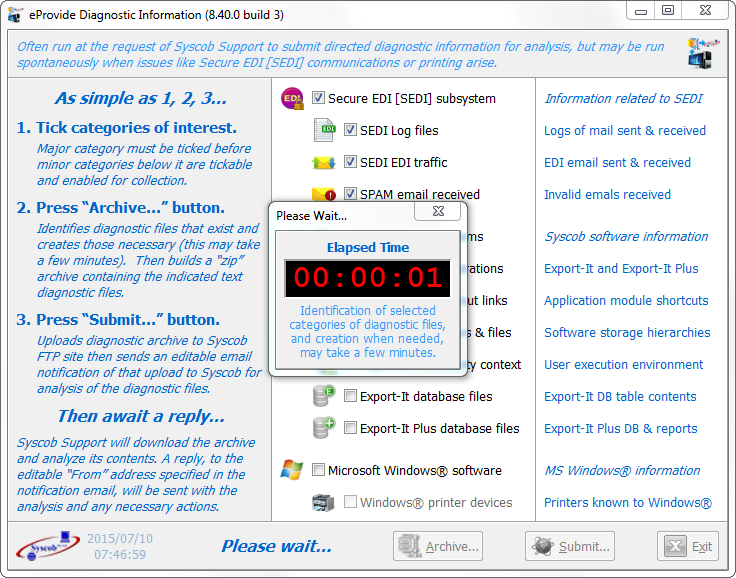
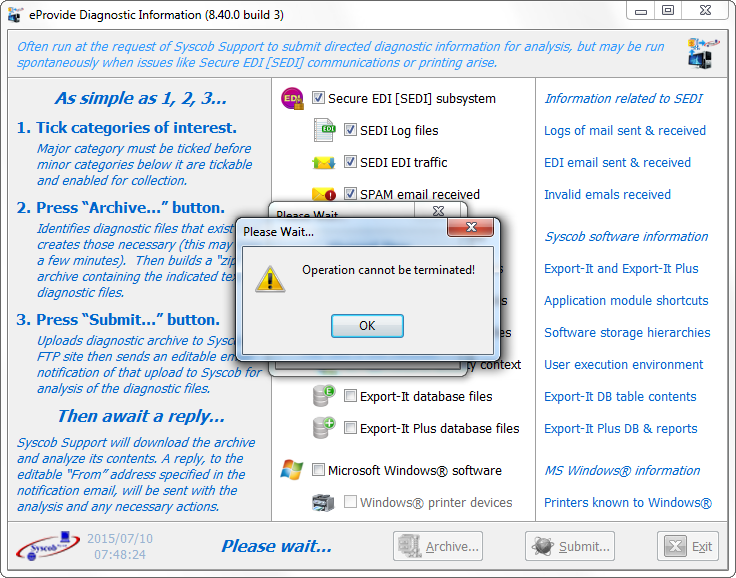
While the Elapsed Time dialog above is visible identification is underway and the dialog cannot be closed. Attempting to do so will cause this warning:
The next phase, after the information to be collected has been identified, is to display a progress dialog while the archive is being built:

When the archive has been built the user will be notified of the file name and the its size (92.8 kilobytes in this case):
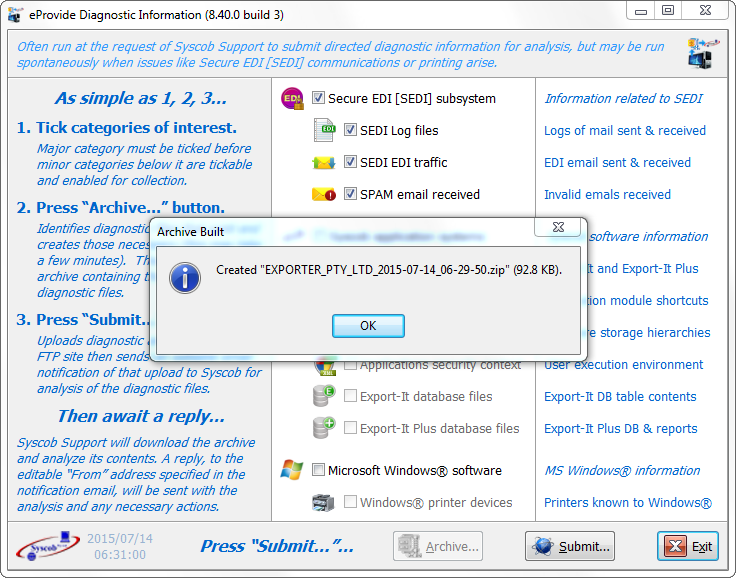
During archiving pressing the Cancel… button will allow abort of the archive construction—to change the information chosen, for example—but that will require confirmation. After a cancel the archiving action may be restarted by pressing the Archive… button in the main window.
Step 3: FTP Upload and Syscob Notification
After the diagnostic archive has been built the third step is to submit that file to Syscob and notify them of the support request. Starting tis final step requires the user to “Press “Submit…”…” as directed in the footer.

The first phase of submission is to upload the diagnostic archive to the Syscob web site using File Transfer Protocol [FTP]. During this upload a progress dialog like the next capture will be visible. It shows the qualified name of the archive file—which reflects the software owner and the date and time it was built—being uploaded. The FTP mechanism is also tracked showing its state, status and progress.
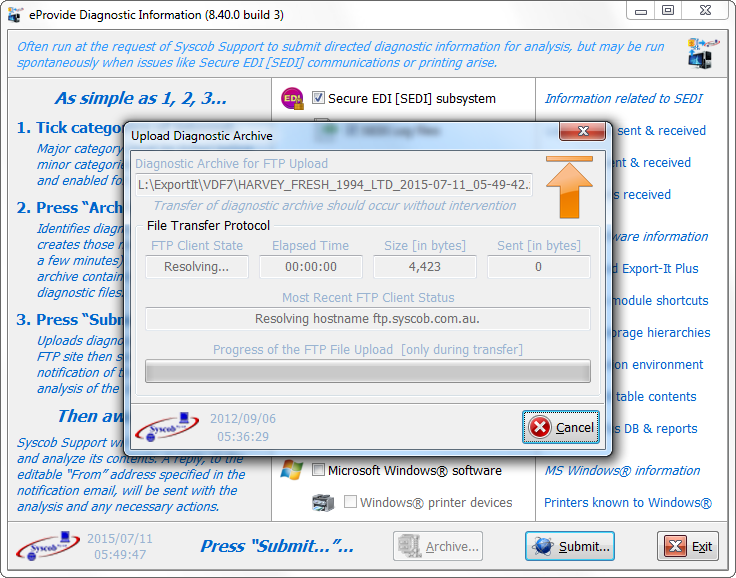
If the Cancel button is not pressed and there are no constraints on InterNet FTP transfers the upload will complete and a dialog will indicate success. Note that an eProvideSession.log file (i.e. log of archive construction) is part of the archive that was sent.

However, FTP is a protocol which is often constrained by hardware or software firewalls (or other network security) at a site. It is also dependent on other protocols—like Dynamic Name System [DNS] to resolve host names—which can fail and result in “exceptions” and other critical errors. Such will result in error dialogs (which are usually fatal).

Should an exception be aborted, or other fatal error occur, a failure dialog will indicate the percent uploaded before the transfer failed. The dialog also shows the unqualified name of the archive file while the path to its location is visible in the progress dialog behind it. This information may be needed for manual transfer of the diagnostics archive file to Syscob.

It is also possible to press the Cancel button at any point in the upload to abort the upload. Whenever the FTP upload is aborted the cause will be logged and a confirmation dialog will allow the user to change their mind.

Should the upload fail or be aborted the progress dialog will close and all main buttons, except Exit, will be disabled and the user is informed that eProvide was aborted without making a submission.

When the aborted dialog above appears during either phase of Step 3, the Submit… step, the user will need to take action to compensate for what eProvide did not do. If the FTP upload fails or is aborted then the diagnostic archive may be attachable to an email sent “To” support@syscob.com.au (if it is under 10 megabytes in size). If failure or abort occurs in the second notification phase then the diagnostic archive has been uploaded so all that the user need do is send an email to Syscob informing them of the upload.
Notification is Second Phase of Submission
In most cases the FTP upload will succeed and when the FTP dialog closes an eDeliver command (icon at right) will be issued to send an email message to Syscob. As the default “From” for this message is the site EDI email account it is strongly suggested that this be changed to the person desiring the reply from Syscob—or the reply will go to the “Human Email” contact of the last maintenance invoice. Also note that the “Attach” text file, eProvideCollect.log in this case, provides the log up through the send via FTP.

As the body suggests it is also useful that the fourth and fifth lines of the body be changed to briefly describe the issue or issues which are the reason for this support request—although this is entirely optional. When satisfied with the “From” (which is also the “ReplyTo”) address press the Send… button at the bottom of the dialog to start sending the notification email.

Normally the eDeliver dialog will track sending of the notification email message and when completed successfully the user will be informed by an information dialog as below. Upon answering that dialog the main window will direct the user to “Press “Exit”…” in the footer.

When the Exit button is pressed the main eProvide window will close. It is now just a matter of patiently awaiting a reply from Syscob Support with the results of their analysis and any required corrective actions.

However, it is possible that sending of this email message will fail or be aborted. In that case the user should note the location of the log file named in the Attach field (eProvideCollect.log) then answer the error dialog to terminate. After the eProvide window closes the user should send an email “To” support@syscob.com.au and attach that file, or the full eProvide.log file, and the eDeliver.log file. When sending fails a dialog, showing an abort like the following sample, will indicate what (if anything) remains undone when some of the reporting steps have been performed.

Regardless of whether eDeliver succeeded in sending the norification or the user had to manually send an email with the named log file attached it is critical that Syscob Support be notified of this support request. Even a telephone call would be useful. For until Syscob is aware of this submission it cannot be analyzed and acted upon.
Await Reply From Syscob Support
Upon receipt of the notification email message Syscob Support will download the diagnostic archive, extract its content and analyze the submission. This may require a short or long time depending on the complexity of any issues exposed. It may also require several minutes to compose a reply when the situation is complex or unclear. Generally the recipient named as the “From” on the notification email will receive the Syscob reply in ½ to 1 hour and that reply will both explain the issues discovered and the actions needed to restore proper operation of the Syscob applications.
Given the complexity of EDI and dealing with numerous communications components external to the Syscob software some patience is required. It is the objective of Syscob Support to provide both high quality and timely support to its customers, but that requires time. Even in time critical situations any attempt to rush a response will only add to the delay in addressing any problems. So please patiently await the support reply.